android:layout_above 将该控件的底部置于给定ID的控件之上;
android:layout_below 将该控件的底部置于给定ID的控件之下;
android:layout_toLeftOf将该控件的右边缘与给定ID的控件左边缘对齐;
android:layout_toRightOf将该控件的左边缘与给定ID的控件右边缘对齐;
android:layout_alignBaseline将该控件的baseline与给定ID的bas eline对齐;
android:layout_alignTop 将该控件的顶部边缘与给定ID的顶部边缘对齐;
android:layout_alignBottom 将该控件的底部边缘与给定ID的底部边缘对齐;
android:layout_alignLeft 将该控件的左边缘与给定ID的左边缘对齐;
android:layout_alignRight 将该控件的右边缘与给定ID的右边缘对齐;
// 相对于父组件
android:layout_alignParentTop 如果为true,将该控件的顶部与其父控件的顶部对齐;
android:layout_alignParentBottom 如果为true,将该控件的底部与其父控件的底部对齐;
android:layout_alignParentLeft 如果为true,将该控件的左部与其父控件的左部对齐;
android:layout_alignParentRight 如果为true,将该控件的右部与其父控件的右部对齐;
// 居中
android:layout_centerHorizontal 如果为true,将该控件的置于水平居中;
android:layout_centerVertical如果为true,将该控件的置于垂直居中;
android:layout_centerInParent如果为true,将该控件的置于父控件的中央;
// 指定移动像素
android:layout_marginTop上偏移的值;
android:layout_marginBottom 下偏移的值;
android:layout_marginLeft 左偏移的值;
android:layout_marginRight 右偏移的值;
example:
android:layout_below = "@id/***"
android:layout_alignBaseline = "@id/***"
android:layout_alignParentTop = true
android:layout_marginLeft = “10px
<?xmlversion="1.0"encoding="utf-8"?>
<LinearLayoutxmlns:android="http://schemas.android.com/apk/res/android"
android:layout_width="fill_parent"android:layout_height="fill_parent"
android:orientation="vertical">
<RelativeLayoutandroid:id="@+id/Relativelayout01"
android:layout_width="wrap_content"android:layout_height="wrap_content">
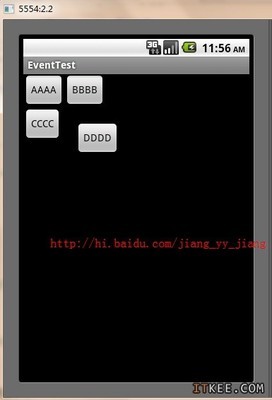
<!--第一个设置的默认居于父容器的左上部-->
<Buttonandroid:id="@+id/a"android:text="AAAA"
android:layout_width="wrap_content"android:layout_height="wrap_content">
</Button>
<!--设置b位于a的右边-->
<Buttonandroid:id="@+id/b"android:text="BBBB"
android:layout_width="wrap_content"android:layout_height="wrap_content"
android:layout_toRightOf="@+id/a"></Button>
<!--设置c位于a的下面,默认居父容器的左部-->
<Buttonandroid:id="@+id/c"android:text="CCCC"
android:layout_width="wrap_content"android:layout_height="wrap_content"
android:layout_below="@+id/a"></Button>
<!--
设置d位于c的右边,b的下面,如果没有设置居于c的右边,则偏离左边的位置就是其中的margin值,是如果没有设置layout_below
则放置在跟b的位置同一水平位置居于c的右边,设置左、上距离是20dp
-->
<Buttonandroid:id="@+id/d"android:text="DDDD"
android:layout_width="wrap_content"android:layout_height="wrap_content"
android:layout_toRightOf="@+id/c"android:layout_below="@+id/b"
android:layout_marginTop="20dp"android:layout_marginLeft="20dp"></Button>
</RelativeLayout>
</LinearLayout>
效果如下: